I had so much fun doing this craft. Not only does it come out great but you can customize it however you want!
I will show you step by step on how to customize your own wipey case.
 |
You will need:
*a wipey case (and kind)
*hot glue gun
*scissors
*fabric to cover both sides
*ribbon
*adornments of your choice |
 |
| Starting at the top of the case, I started placing little lines of hot glue and adhering the fabric. Do not put the hot glue right up against the seam. I did the top first, then the bottom, and the the sides. Your goal is to make the fabric as tight as possible so stretch, stretch, stretch. Leave just a little bit of space to allow you to cut off the extra fabric. If you don't, your scissors will not be able to get off enough of the extra fabric (If you look closely, you will notice I made this mistake) |
 |
Notice how sloppy my work is :) Don't worry, it will be covered up.
|
 |
This is what it looks like when top and bottom are done.
|
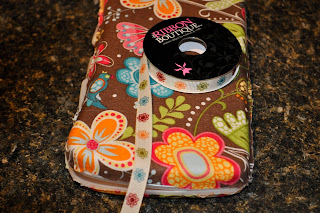 |
I chose this really cute ribbon to go around the edges. Just remember, the ribbon doesn't need to be too wide or else it will be too big.
|
 |
I started at the back of the wipey case in the middle so my seam wouldn't be as noticeable.
|
 |
As I 'fed' the ribbon I would put a couple inches of hot glue, smooth the ribbon down and then move to the next 2 inches until I had completed the circle.
|
 |
This is what it will look like when you finish. You can choose to leave it or if you want to add more 'oomph' read on. :)
|
 |
I chose this ribbon because of the matching colors and hot glued it about 1 1/2 inches from the top.
|
 |
I had these cute little rounds of fabric that I purchased at Hobby Lobby and I added it to the top :)
Voila!!! How cute is that!! |


No comments:
Post a Comment